System Overview
The graphic below is a high-level overview of the installation process where the highlighted correspond to the areas where you must do something to install the Automic Web Interface.
The Automic Web Interface and the AE server must have the same release version. To check other compatibility issues, see Automic Compatibility Matrix.
Click the image to expand it.

Installation Steps

![]() If you want to print this page, click
If you want to print this page, click ![]() on the menu bar to expand the steps below:
on the menu bar to expand the steps below:
To Install the Automic Web Interface
-
Install and start the Application Server.
Before installing the Application Server, have a look at Automic Compatibility Matrix to check which version is compatible with AWI.
-
Go to the Tomcat homepage and download and install the required version. You will find the installation instructions and other relevant information on their homepage.
For Windows: Download the package called "32-bit/64-bit Windows Service Installer." This will install Tomcat and a Windows service for it.
-
Increase the memory that Tomcat can allocate to AWI to the amount described in the table that follows.
Reason: By default Tomcat allocates a low amount of memory to an application. This is not sufficient for AWI, which keeps a lot of UI state data in memory.
Memory Parameter Amount to Allocate Heap size As much as possible (at the very least 2GB)
On Windows:
- Go to the "bin" folder in your Tomcat installation (...Apache Software Foundation\Tomcat 7.0\bin).
- Right-click the file tomcat7w.exe and from the context menu select Run as administrator.
-
On the Java tab set the heap size by setting the Maximum memory pool to the maximum possible on your system, for example 8192MB, as shown below:
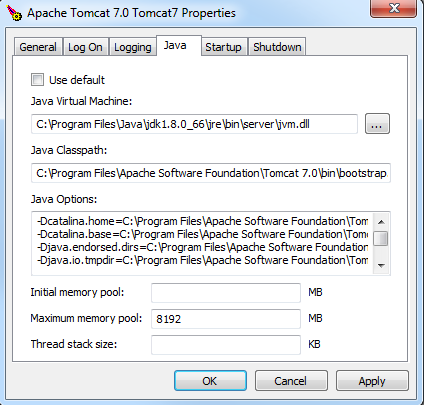
-Xmx8192m
On Linux
In the CATALINA_OPTS environment variable, set the heap space to the maximum possible on your system. In this example, the heap space is set to 8192MB:
-
Make sure that Tomcat automatically starts when you start the server that it is installed on, for example, with a Windows service or an init script.
-
Start Tomcat and go to the default URL to verify that it is responsive.
-
Go to the IBM WebSphere homepage and download and install the required version. You will find the installation instructions and other relevant information on their homepage.
The JAXB supplied by WebSphere does not provide the configuration required by AWI, so to ensure that it runs properly on WebSphere you must disable the JAXB and configure WebSphere as described in the following steps.
-
By default, the classloader delegation mode used by WebSphere is PARENT_FIRST. Change it to PARENT_LAST.
You have two options:
-
Using the WebSphere® Application Server Deployment editor.
You can find a guide here: Setting class loader policy to an enterprise application targeted for a WebSphere Application Server.
-
Using the command line.
You can find a guide here: Modifying WAR class loader mode using wsadmin scripting.
If you have other applications running on WebSphere please make sure that you change the classloader setting for the Automic Web Interface module only!
-
-
Turn off web services annotation scanning and set the correct JAXB context as follows:
- In the WebSphere administrative console select Servers.
- Expand Server Type and select WebSphere application.
- Select the name of your server.
- Expand Java and Process Management and select Process Definition.
- In the Additional Properties section click Java Virtual Machine.
-
In Custom Properties:
-
Set the com.ibm.websphere.webservices.DisableIBMJAXWSEngine property to true.
If it does not already exist, you can create it clicking New.
-
Set the javax.xml.bind.JAXBContext property to com.sun.xml.internal.bind.v2.ContextFactory.
If it does not already exist, you can create it clicking New.
-
-
Restart WebSphere.
Go to the default URL to verify that it is responsive.
Go to the Tomcat homepage and download and install the required version. You will find the installation instructions and other relevant information on their homepage.
There is no need for any specific WebLogic configuration with regard to the Automic Web Interface.
-
-
- (Optional) Rename the WAR file to AWI.WAR, keeping the "war" extension. The name of the WAR file will also be the context path of your AWI installation.
-
Do one of the following:
Tomcat installation
On the server where you have the Tomcat installed, copy the WAR file to the webapps folder of the Tomcat installation. If the Tomcat is running, the WAR file will be deployed automatically, creating a folder with the same name.
Do not delete the WAR file! If you do, the application server will also remove the corresponding subfolder, which also undeploys the AWI!
WebSphere installation
Please refer to the IBM WebSphere official documentation for details.
WebLogic installation
Please refer to the Oracle WebLogic official documentation for details.
-
 Configure the connections to AE Systems
The Automation Engine is AWI's backend; it provides the databases as well as all object types and object definitions. The uc4config.xml is where you define one or more AE systems that AWI users can log into. Whether users can select an Automation Engine connection or are restricted to only the first connection that is defined here, depends on how the "automationEngine.index" property in the configuration.properties file is set.
You find uc4config.xml in your application server in the folder ...\<AWI>\config.
- In your web application server go to the folder …\<AWI>\config.
- Rename the file uc4config.xml.sample to uc4config.xml.
Some configuration files are delivered with the extension "sample" to ensure that your existing configuration files will not be overwritten when you update the AWI installation.
- Open the renamed file and update the configurations as described in the table that follows.
- For the changes to take effect, stop and restart your application server.
Structure
The table that follows explains the structure of the file and describes the parameters and settings with their possible values.
Parameters
Description
<configuration> The beginning of the configuration. <trace count="count" xml="XML trace"></trace> Options for the trace file for the AE API calls. This logs the communication between AE and AWI from the AWI point of view.
These values are set by Automic. Do not change them unless explicitly instructed to do so by Automic Support.
For information about the various logging and tracing options in AWI, as well as steps for collecting log data when reporting an error to Automic support, see "Preparing Log Files for Error Reporting."
<connections>
The beginning of the elements for the connections to AE systems.
<connection name=name" system="system">
Define one <connection> element for each AE system that you want this AWI instance to be able to connect to.
name = An alias for the connection to an AE system. When logging into AWI, this is the name that appears in the Connection field and in its drop-down selection list.
system = The name of the AE system. This is defined in the Automation Engine's INI file.
Important: Every connection must have a unique definition of system and name.
For more than one <connection> element: By default, when users log into AWI they can choose the connection for the system they want to log into. However, you can force all users to log into a particular connection. To do this, specify the connection in the the automationEngine.index parameter in the configuration.properties file. Change the default setting of "-1" (all connections available) to the value for the connection you want. This is a 0-indexed parameter, so "0" means the first connection that is defined, "1" means the second connection, and so on.
<cp ip="DNS/IP" port="Port"/>
Definition of the connection to the AE system's communication process (CP).
DNS/IP = Specifies the name or the IP address of the computer on which the communication process runs.
Port = Port number of the communication processes in the AE system.
If you define more than one CP for a connection, the system will try to connect to the first CP in the list, and if it fails, then the system will try the next and so on, until it can connect successfully.
For more information about the communication processes in AE, see "Establishing a Connection" in the Inside Automation Engine help or PDF.
</connection> The ending of the XML element <connection>. </connections> The ending of the XML element <connections>. </configuration> The ending of the XML element <configuration>. Example:
<configuration>
<logging count="10"></logging>
<trace count="10" xml="0"></trace>
<connections>
<connection name="AE Prod" system="AEPROD">
<cp ip="aehost01" port="2217"/>
<cp ip="aehost01" port="2219"/>
<cp ip="aehost01" port="2220"/>
</connection>
<connection name="AE Test" system="AETEST">
<cp ip="testsys" port="2217"/>
</connection>
</connections>
</configuration>
-
Start the Automic Web Interface
- Enter the following URL in the address bar of your Internet browser:
http://hostName:XXXX/ecc.webappName/ where:
hostName = The name of the computer on which the application server runs, such as "localhost".
XXXX= The default port for the application server. (This might be different depending on how you setup up the application server deployment.)
ecc.webappName = The name of the WAR file (without the file extension).
Replace XXXX with the default port number for your application server.
-
Log in to client 0 AWI with your user name and password.
Client 0 is a system client that is supplied by default with your installation. Here you add further clients, create users, assign them to their corresponding clients, etc. Please refer to the Administration Guide.
On the browser, you need enable cookies, disable pop-up blockers, and, after each upgrade, empty the cache. See "Troubleshooting Problems on AWI Clients" for tips about how to ensure that users see all AWI parts correctly and have no login problems.
- Enter the following URL in the address bar of your Internet browser:
Next steps:
Configure AWI - Configuring Automic Web Interface
You can start setting up your system now (create clients and users, assign rights, etc.) or you can continue with the installation of other Plugins and components.
- Setting up Single Sign-On
- Creating Clients and Users
- Installing Automic Release Automation (ARA)
- Installing LDAP Sync
- Installing and Configuring Package Manager
- Installing and Configuring the Plugin Manager
- Installing and Configuring the Action Builder
- Installing Analytics (ANOP)
- Installing Process Analytics
- Installing the Proxy
See also: