Installing Analytics and the Event Engine
Analytics is an optional component of Automic Automation and it is fully integrated with the Automation Engine. Analytics lets you create data-rich charts and dashboards from both Automation Engine and external data. There are specific Analytics widgets that incorporate many productive features. For example, the VARA to Grid widget can help you analyze data related to KPIs and general objectives. The VARA to Chart can help you create charts based on data accessed via VARA objects. For more information, see Using Analytics.
The Event Engine can be installed with Analytics, and as it use the same datatore as Analytics, it is obligatory that you install the Analytics Datastore and Backend prior to installing the Event Engine.
See: Getting Started with the Event Engine
This page includes the following:
Prerequisites
Analytics requires PostgreSQL for extracting the data to be used in the charts.
Important! Use the compatibility matrix to find the relevant information on supported versions, setup, or prerequisites. For more information, see Automic Compatibility Matrix.
System Overview
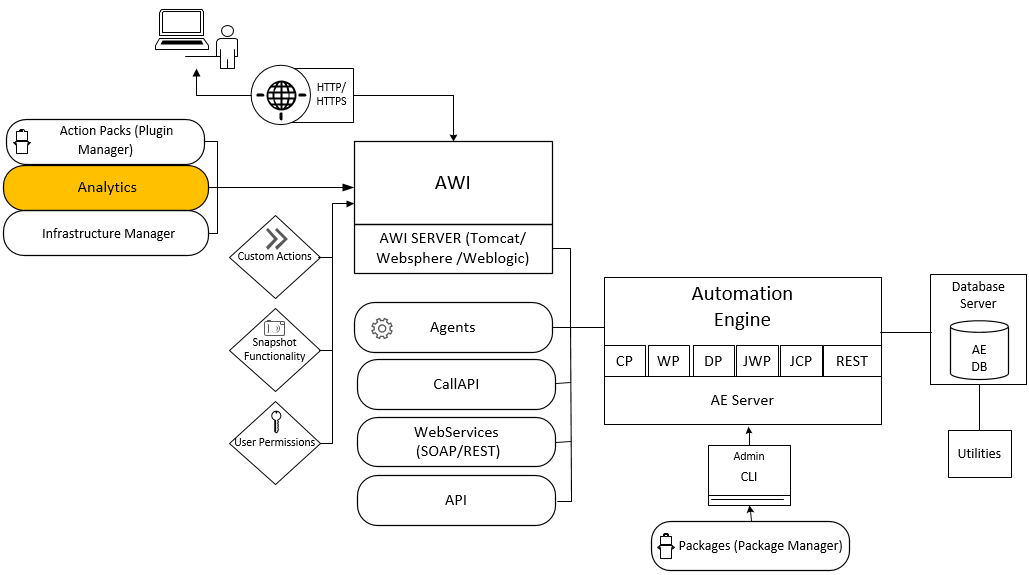
The graphic below is a high-level overview of the installation process. The highlighted area shows where you must do something to install Analytics.
Click the image to expand it.
Analytics Infrastructure
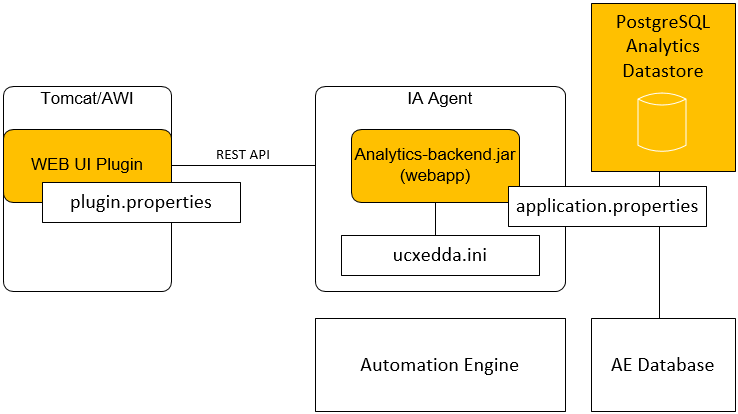
Analytics consists of three main components. This graphic illustrates the Analytics infrastructure and highlights the main components in yellow:
Click the image to expand it.
-
The Analytics backend is responsible for data exchanges between the Automation Engine and Analytics.
The Analytics backend is bundled into the IA Agent that is delivered with the Analytics package. It connects to the Analytics datastore and to the Automation Engine database through the application.properties file, and to the Automation Engine through the ucxedda.ini file. Its core is the analytics-backend.jar file.
To start the Analytics backend, you start the IA Agent.
-
The PostgreSQLAnalytics datastore, the Analytics database that extracts the data from the Automation Engine to be used for reporting purposes.
-
The Web UI plugin that contains the plugin.properties configuration file with the REST API encryption key for security and connection details to the Analytics database.
Installing Analytics
Overview
This list summarizes the procedure to install Analytics. The following sections in this topic describe each step in detail.
-
Copy the Analytics files.
The Automic Automation install package that you have downloaded contains all the Analytics files that you need.
Copy the Analytics folder available under
Automic.Automation_<version number>/Automation.Platformin the installation package to your Automic Automation directory where you want to run Analytics. -
Install and configure the Analytics datastore.
-
Install PostgreSQL if you have not already done so.
-
Configure the database.
-
Deploy the Analytics data structures.
For more information, see Installing and Configuring the Datastore.
-
-
Install and configure the backend
-
Configure the backend using the application.properties file so that it can interact with the Analytics datastore and the Automation Engine database.
-
Copy the JDBC driver to enable data connections.
-
Update ucxdda.ini to allow connection between the backend and the Automation Engine.
-
Configure the Service Manager for Analytics.
For more information, see Installing and Configuring the Backend.
-
-
Install and configure the Web UI plugin
-
Copy the Web UI plugin over to Tomcat.
-
Update the plugin.properties file to enable the communication between the plugin and the backend over the REST API.
For more information, see Configure the Analytics Web UI plug in. .
-
Installing and Configuring the Datastore
PostgreSQL must be installed and configured for Analytics to run. The PostgreSQLAnalytics datastore extracts the data to be used for reporting purposes. If you have not already done so, install PostgreSQL now. Download PostgreSQL 10.x or higher from www.postgresql.org/download/
When installing PostgreSQL, you will have to set the super user password. Keep this password at hand, you will need it later.
This topic does not cover the PostgreSQL installation procedure. It only touches on aspects of the installation that are relevant for Analytics and describes how to configure it. For information about the PostgreSQL installation, please refer to the official PostgreSQL documentation.
Important! Use the compatibility matrix to find the relevant information on supported versions, setup, or prerequisites. For more information, see Automic Compatibility Matrix.
Note: To optimize database performance and efficiency, see: Maximizing Efficiency with the Datastore located in Analytics - Sizing Requirements.
PostgreSQL on Windows
-
The PostgreSQL installer for Windows can be run in graphical or in silent install mode.
-
It is not necessary to install the Stack builder.
PostgreSQL on Linux
Make sure that the tcp/ip connection is enabled (localhost).
To Configure PostgreSQL
-
Configure PostgreSQL so that it can accept connections from any user and host. You do this in the
pg_hba.confPostgreSQL file.-
Go to
PostgreSQL/<version number>/dataand openpg_hba.conf.Note: By default, the PostgreSQL files are stored in Program Files.
-
In
pg_hba.conf, add the following:TYPE: host
DATABASE: all
USER: all
ADDRESS: 0.0.0.0./0
METHOD: md5
-
-
To upload the Analytics data structures to PostgreSQL, execute a script called
setup.psqlthat is provided with the Analytics installation package. The script is located under <installation directory>\Automation.Platform\Analytics\Datastore\setup.psql.Execute the
setup.psqlscript from the Analytics datastore directory using the following PostgreSQL psql command:[path to postgres bin]\psql -h vmwin -p 5432 -U postgres -W -v username="analytics" -v password="'analytics'" -v db_name="analytics" -f setup.psql
Where:
-
-his the host where the database is -
-pis the port (by default, this is 5432) -
-Uis the super user -
-Wmeans no super user password -
-vare the script parameters for the database username, the password and the name of the database -
-fdesignates the script that will be executed.
Tip: Keep the Analytics defaults, all in lowercase
When executing the script you will be prompted to enter the PostgreSQL super user password.
The script creates the following:
-
A role
-
A database
-
The rest of the datastore
-
The backend API key
This is the key that secures the communication between the different components and the Analytics backend.
-
Important! Copy the contents of the command window to a text file. You will need the API key as well as the datasource URL, username and password later.
The datastore is installed and configured. You must install and configure the Analytics backend now.
Installing and Configuring the Backend
The Analytics backend pulls the data from the Automation Engine and makes it available to the web interface. You need to configure the backend so that the data exchange is possible.
Note: If your organization is using the Event Engine, the Analytics Backend is already installed. If this is the case, you can skip this section of the installation. If not, these topics will guide you through the installation of the Analytics Backend.
To Install the Analytics Backend
- Unzip the content of the deployment package (
Analytics.On.Premise_Analytics.Backend_ .zip) into the folder where you want to run the backend.Package content
analytics-backend.jar
application.properties.sample
logging.xml
README.txt
THIRD-PARTY-LICENSES.txt
UC.msl
UCXedda.ini
-
Configure the backend to connect to the Analytics datastore and the Automation Engine database.
The backend has a configuration file called
application.properties.samplein the Analytics/backend folder. You configure the connection here.-
Copy
application.properties.sampleand rename it toapplication.propertiesto keep the original file and do the configuration in the renamed one. -
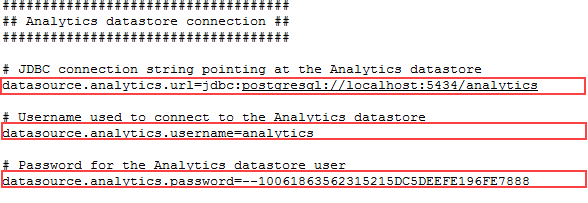
To specify the connection to the Analytics datastore, open
application.propertiesand enter the datastore URL, username and password. You find these values in the text file where you stored the content of the command window after executing thesetup.psqlscript.Example:
-
To specify the JDBC connection to the Automation Engine database, in
application.propertiesenter the database URL, username and password.Oracle
-
Specify a read-only user for the Oracle schema. For this purpose, create a text file in the Analytics backend directory. You can call it AE schema.sql, for example.
-
In the text file, write the following:
ALTER SESSION SET CURRENT_SCHEMA=automicThis will set the schema to automic while retaining the already configured database username and password.
-
In
application.propertiesenable the following setting:datasource.AE.schema=file:AE_schema.sql
Important! In some Oracle versions the user name and password are case-sensitive.
DB2
-
Specify a read-only user for the DB2 schema. For this purpose, create a text file in the Analytics backend directory. You can call it AE schema.sql, for example.
-
In the text file, write the following:
SET SCHEMA=automicThis will set the schema to automic while retaining the already configured database username and password.
-
In
application.propertiesenable the following setting:datasource.AE.schema=file:AE_schema.sql
PostgreSQL
You find the database URL in the
JDBCsection,sqlDriverConnect=parameter in the Automation Engine's UCSrv.ini file. The username and the password were set when the Automation Engine database was created. -
-
Save and close
application.properties. -
To enable the connection to the Automation Engine database, create a jdbc folder and copy the correct JDBC driver from
/bin/libin your Automic Automation installation directory to the new jdbc folder.The JDBC drivers are:
-
MSSQL:./jdbc/sqljdbc4.jar
-
Oracle:./jdbc/ojdbc7.jar
-
DB2: ./jdbc/db2jcc-4.jar
-
-
-
To connect the Analytics backend to the Automation Engine, enter the name of the Automation Engine system, the host and the port in the
ucxedda.inifile that is available in the Analytics Backend directory.Example:
; system: AE system name
; The name can consist of a maximum of 8 characters. Allowed are the upper-case letters A to Z, numbers and "_".
system=<name of your AE system>
...
; cp: Address of the CP communication process in the AE system to which the component should connect.
; Allowed formats:
; DNS Name:Port number
; TCP/IP Address:Port number
cp=<host>:2217
-
To configure the Service Manager to be able to control Analytics and to set it to start automatically at boot, update the
UC4.smdand UC4.smc files. They are located in theServiceManager/binfolder in your Automic Automation installation directory.-
Stop the Service Manager.
-
Open the
UC4.smdfile and enter the following:DEFINE ANALYTICS-BACKEND;C:\Program Files\jdk-11.0.14\bin\java -Xmx2g -Xms512m -XX:+UseG1GC -jar analytics-backend.jar;C:\<Analytics installation directory>\Analytics\backend
Where:
-
DEFINE ANALYTICS-BACKEND is an AE instruction to create the Analytics service
-
C:\Program Files\jdk-11.0.14\bin\java -Xmx2g -Xms512m -XX:+UseG1GC -jar analytics-backend.jar is a Java command from the Java bin directory with some standard arguments. Keep them as they are.
-
C:\<Analytics installation directory>\Analytics\backend is the directory from which
analytics-backend.jaris executed
-
-
Save and close
UC4.smd. -
Open the
UC4.smcfile. It contains the autostart and timing instructions.Enter the following:
WAIT 3
CREATE ANALYTICS-DATASTORE
WAIT 14
CREATE ANALYTICS-BACKEND
-
Save and close
UC4.cmd.
-
-
Start the IA Agent from the Service Manager. This starts the Analytics backend.
To confirm that the IA Agent is online, log in to Automic Automation and go to the Administration perspective > Agents list.
Troubleshooting: If the IA Agent is not online, check the Agent (ucxedda.log) and the backend (analytics-backend.log) log files.
-
Configure the Analytics Web UI plug in.
-
Copy the
webui-analytics-plugin.jarfile from theAnalytics/pluginfolder in your Analytics installation directory toTomcat\webapps\AWI\WEB-INF\autoinstallin your Automic Automation installation directory. -
To configure the plugin so that it can access the backend, open the
plugin.propertiesfile located inTomcat\webapps\awi\config\webui-plugin-analyticsand enter the following:-
backend.api_key=This key secures access to the backend REST API. It was generated by the
setup.psqlscript when you set up the datastore. When setting up the datastore, you copied this key to a text file. -
backend.endpoint=This is the hostname of the Analytics Backend host
-
-
Log out and log in again to AWI to load the plug-in and create the config files:
<Automic>/External.Resources/apache-tomcat/webapp/awi/config/webui-plugin-analytics/plugin.properties
-
Add the API key created when installing the datastore to the config files and adapt the backend URL if AWI is not running on the same host.
-
Restart Tomcat.
-
Configuring the AWI Cache
The Analytics cache can speed up repetitive database queries by keeping results in memory until a configured expiration time is reached. The default values can be found in the application.properties file.
Default Cache Values:
#########################
## Cache configuration ##
#########################
# Enable caching of charts
service-cache.enabled=true
# Request cache expiration
service-cache.expiration_minutes=120
# Request cache refresh
service-cache.refresh_minutes=2
# Specify how many requests should stay cached at maximum
service-cache.size=10000
# Specify the mode of the expiration process
# Possible values: after_access, after_write
service-cache.expiration_mode=after_write
Where:
-
service-cache.enabledturns the cache on and off -
service-cache.expiration_minuteslets you to set the expiration minutes value.This parameter controls the deletion time for cached values. If your database queries take more than two minutes, you should change the expiration time to a value between 30 and 120 minutes. These settings depend on your data freshness requirements.
-
service-cache.refresh_minutesdetermines when the cache should be refreshed in minutes -
service-cache.sizedefines the number of items you would like the cache to holdIf you are using more than 10 different dashboard widgets, you should set your cache size to 10000 items.
-
service-cache.expiration_modedetermine how the expiration timer is startedIf you set the parameter to after_write the timer starts after the value has been written to the cache. If you set the parameter to after_access the timer starts after the cache value has been accessed. An example when the timer starts is when you open a dashboard and a chart is displayed.
Securing the Backend
As a Backend Administrator you can secure communications to restrict access to authorized users.
The UI plug-in communicates with the Analytics backend using HTTPs. A pre-shared API key is used to protect the data in the Analytics backend and restrict requests to authorized API users only. This key is created during the datastore setup.

To Secure the Backend
-
Enable TLS/SSL on the backend by setting the following in the application.properties file:
server.port=8443
# next 3 properties must be deactivated (commented out) if you want to use the Backend with http
server.ssl.key-store=classpath:localhost.p12
server.ssl.key-store-password=analytics
server.ssl.key-password=analytics
A valid TLS/SSL certificate (
localhost.p12in this example) must be within the root classpath of the backend application. -
Set the front end to call the Backend with HTTPS.
The URL to call the Backend is set in the webui-plugin-reporting/plugin.properties file.
backend.endpoint=https://localhost:8443
backend.endpoint.verifyCertificate=true
Where:
- backend.endpoint.verifyCertificate=true means that the certificate is properly checked (it must be from a certified, known provider). If you want to use a self signed certificate, you must add it to the local java cacert file.
- backend.endpoint.verifyCertificate=false means that the certificate is not validated.
To Set the Analytics Action Pack to Use HTTPs
-
Click Process Assembly perspective.
-
Open the PACKAGES folder and select the PCK.AUTOMIC_ANALYTICS Action Pack.
If this package is not available, you can download it from our marketplace at https://marketplace.automic.com/.
-
Double-click ACTIONS and again ANALYTICS. The Analytics Actions are displayed in the list.
-
Execute the PCK.AUTOMIC_ANALYTICS.PUB.ACTION.ANALYTICS_CONFIGURATION Action to configure the Analytics Action Pack.
-
Select Requests in the menu bar.
The content of the request contains the fields for setting the Analytics Action Pack to use HTTPs.
-
Enter the following Analytics backend URL: https://<your.analytics.host>:8443
-
Add the self-signed certificate to the Java installation on the Agent you decide to execute the Analytics Actions.
Notes:
-
The self signed certificate is located in the local CAcert trustStore of the java version that is used to execute the analytics-groovy-runner.jar file.
-
You can also ignore TLS/SSL issues arising from untrusted certificates and host name mismatches. To do so, select the Yes radio button.
-
Once you have configured your agent to use the HTTPs, all services that run on the agent are switched to HTTPs. The HTTP interface will not longer work.
-
When you use a certificate to secure your interface, the certificate is applied to all services running on the IA Agent.
-
- Click Submit
As a Automation Engine user, this section provides you with a guide to installing Analytics and the Event Engine. Analytics and the Event Engine are optional parts of the Automation Engine and consists of several components.
Installing Analytics and Reporting for Internal and External Data
Analytics and Reporting is fully integrated with the Automation Engine, which provides the data for analysis. The Analytics Backend retrieves statistical data from the Analytics Datastore, computes indicator values to help you create dashboards in AWI.

To start installing Analytics and Reporting, you need the Analytics Backend and datastore. Then, continue installing as described in the following topic:
Installing the Event Engine (Rule Engine)
The Event Engine uses the same datatore as Analytics. You must install the Analytics Datastore and Backend prior to installing the Event Engine.
The Event Engine installation is fully integrated with the Automation Engine. Events can trigger actions using rules and past values. It is also possible to create Custom Rules tailored to your organizations' needs, poll external resources and implement customer-specific sensors and rules on site.
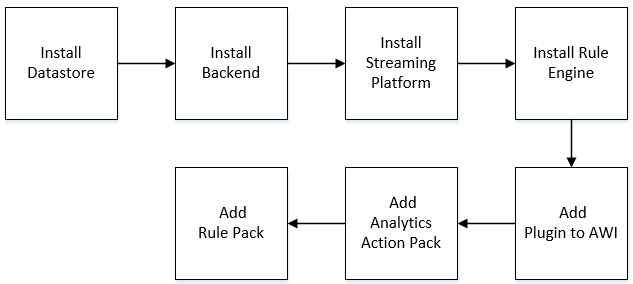
Once the Analytics Backend and datastore are already installed, continue installing the Event Engine as described in the following topics:
- Setting up the Streaming Platform
- Setting up the Rule Engine
- Installing the Analytics UI Plug-in
- Installing an Event Engine Rule
See also: