Executing Objects Recursively
Schedule objects start tasks at predefined intervals in which the minimum period is one day. To process objects at intervals shorter than one day you can use the Execute Recurring option.
There are various possibilities to schedule the execution of tasks. Depending on the nature and properties of the recurrence, you may choose between the following:
-
Design Schedule objects (see Defining Schedule Objects
They are containers of tasks that serve to assign them well-structured, predefined intervals in which they will be executed. The minimum period is one day.
-
Define recursive executions for an object or task
This option allows you to execute tasks in intervals shorter than a day. You can either specify the intervals when defining the recurring execution or assign them a Period Object (PERIOD).
Objects that are executed using the Execute Recurring option are so called Runtime Objects, that is, they are only visible on the Task list of the Process Monitoring perspective as long as they are active. As soon as their executions have finished, they are no longer visible unless you use the Include deactivated tasks option when filtering. See Including or Excluding Deactivated Tasks.
To Execute Tasks Recursively
- Switch to the Process Assembly perspective if you are not already there and do one of the following:
-
Select the object for which you want to schedule recurring executions and do one of the following.
- Right-click an select Execute Recurring.
- Expand the Execute button on the toolbar and select Execute Recurring.
-
The Execution of <object type> dialog is displayed:
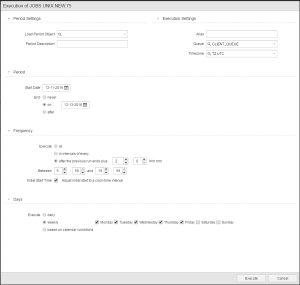
Specify the settings:
Field Description
Period Settings Load Period Object Period objects define when and how often recurring executions should run.
You can assign an existing period object to this recurring execution. If you do so, the settings defined in the period object are loaded into the fields on this dialog. You can leave them as is or modify them as needed for this specific recurring execution.
Type the name of the period or select it from the dropdown list.
Period Description Text as defined in the assigned Period object. You can modify it for this definition, if necessary. Execution Settings Alias If you specify an alias here, this is displayed on the Tasks window in the Process Monitoring perspective to identify this execution.
You can use the same characters as for names, that is, it can contain up to 200 characters.
It is not possible to use variables here.
Queue You can assign a particular queue for this execution, which can be different to the one in the object's definition.
If you leave this field empty, the object queue is used.
Time Zone If you have defined Time Zone objects and you want this execution to consider one of them, select it here. Period Start Date A period always begins on a specific calendar day. Select it here.
Periods can end in different ways:
End: never The recursive execution has no end date. You must stop it manually. End: on Select the calendar date on which the recurring execution should end.
End: after Select the number of executions after which the recurring execution should end. Frequency Execute: at Specify the time of day at which the execution will take place. Execute: in intervals
of everySpecify fixed time intervals (up to 504 hours= 21 days) Execute: after the previous
run ends plusSpecify a buffer time after the end of the previous run (up to 504 hours= 21 days) Allow one overlap Select this option when you want the next scheduled execution to start even when the previous one is still running. Without this option, the execution would be skipped until the next scheduled time according to the other settings. Between When you choose intervals or consecutive runs, rather than one time of day, you can also define a time window during the day that the object is started. By default, this is set to all day between 00:00 and 23:59. Initial Start Time Initial Start Time
This option controls when the first execution starts. It is available when the frequency is defined for fixed time intervals or when it is based on a buffer time after the end of the previous execution.
Usually, when you start a recurring execution with one of these frequency types, the first execution starts immediately. However, when you select the Initial Start Time option, the first execution waits for the next regular segment of an hour, based on the interval or buffer value.
For example, if the interval or buffer is set to 15 minutes, then the execution starts on the next quarter of an hour (that is, hh:15, hh:30, hh:45, or hh:00). All executions after this start according to the rest of the frequency settings.
With Execute in intervals of every:
This is a nice option when you want to execute at intervals, because then the intervals will also start at normal clock-time segments. For example, suppose your period is defined to execute the job in 30-minute intervals, and you start the recurring execution at 9:07.
Without Option:
- 9:07 (immediate start)
- 9:37 (9:07 (start) + 00:30)
- 10:07 (9:37 (start) + 00:30), and so on
With Option:
- 9:30 (start at the next half hour)
- 10:00 (9:30 (start) + 00:30)
- 10:30 (10:00 (start) + 00:30), and so on
With Execute after the previous run ends plus
This option has little effect when your executions start after a time buffer following the end of the previous run. The first execution will start at a normal clock-time segment, for example not at 9:07 when you started the recurring execution, but at 9:15. However, the rest of the executions will start based on the actual runtime of each run plus the fixed buffer time. This will naturally result in irregular clock-time starts.
Days Execute: daily By default this option is activated, that is, the executions are started every day. Execute: weekly You can set the executions to be started only on certain days of the week, such as only on weekdays and not on weekends. Execute: based on calendar conditions You can select calendars and specify whether all, one or no conditions should match for the executions to be started. This allows you to define more complex and precise days for the executions, such as all days except bank holidays. The logical date is applied here.
For detailed information on calendars please click here.
For details on how to work with tables please click here.
-
Click Execute.
As soon as the object starts being executed, it is available on the Process Monitoring perspective.
The task has the same name as the object you have just executed and it displays a container symbol (a blue circle with a white curved arrow) next to its name. This identifies it as a scheduled task. For example:


Modifying the Recurring Settings
You can change the Period-container settings at any time. This is done via the Activity Window using the pop-up menu command "Properties".
Modifying the settings of a period-container is like giving the period-container a new start. Numbers of runs and number of erroneous runs are reset to 0.
The following table shows the earliest start time of a task when the settings have been changed. Calendar definitions, whether overlaps are allowed, possible adjustments to the time frame etc, also play a role.
|
Changing the Frequency to "In intervals of every..." |
Changing the Frequency to "after the previous run ends plus" |
Changing the Frequency to "at" |
|---|---|---|
|
|
|
To Change the Recurring Settings
-
Switch to the Process Monitoring perspective if you are not already there and search for the task. You have various possibilities:
- Using the Global Search.
- Filtering the tasks in the view, see Filtering Tasks.
The task has the same name as the object you have just executed and displays the container symbol next to its name.
-
Right-click the task and select Modify Execution. The Execution of <name of task> dialog is displayed.
Make your changes and click Execute.
See also:
- Execution stages:
- Workflow Logic