Working with Stack Providers
After having installed the Action Packs needed to provision Environments, as an Administrator, you add Stack Providers as a first step for creating Stacks. One of the following technologies can be used: VMware, Docker and AWS.
Important! The actions that you can perform depend on your folder permissions. See: Assigning Release Automation Permissions.
This page includes the following:
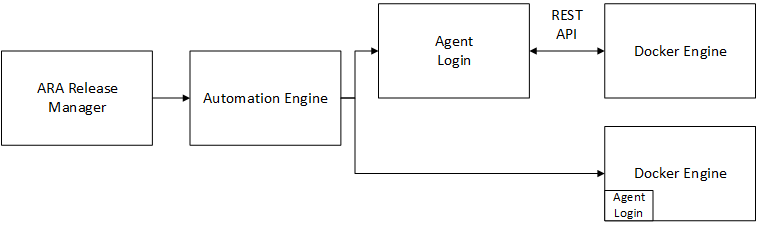
Stack Providers are the "engine" or "technology" which allows to create Stacks based on Stack Templates. They provide the infrastructure and middleware on which the components will run: that is Stack Providers host the image. On top of this engine there is an application, which can be rolled out using CDA.
- Navigate to the Release Automation perspective.
- Click the Provisioning tab.
- Select Stack Providers.
Note: Stack Providers and their availability play a crucial role, because the lifecycle control/monitoring and the Stack provisioning happen via the Providers. If a Provider becomes inactive, the whole Stack handling is disabled. To help users know which Stack Providers may be used to provision a Stack, a notification will pop-up every time a Stack Provider changes its status. See Messages.
Tip: For more information about how search for entities and narrow down the results, see Advanced Search.
This section describes how to add Stack Providers to CDA.
Note: Docker can only be installed on Ubuntu, because a Linux agent is used for provisioning.
To Add a Stack Provider
- Go to the Release Automation perspective.
- Navigate to Provisioning > Stack Providers.
-
Click the Create button in the toolbar. The Create Stack Provider dialog is displayed.
Note: The Create button is disabled if no provisioning provider Pack has been installed. See: Preliminary Steps
- Enter a name for the Stack Provider.
- Select a type.
- From the Folder drop-down list, select a folder to store the new provider. If no folder is selected, the Stack Provider is stored in the default location.
- Define an owner for the provider. The current user is selected by default.
- Click Create. The Properties view is displayed.
-
In the Default Agent section assign an Agent and a Login Object:
Note: Agents execute the deployment processes on the appropriate physical system. For this to happen, the agent has to have the appropriate system privileges. The Login contains login information in the form of credentials.
Important!
- VMWare Stack Providers: PowerCLI has to be installed on the agent.
- AWS Stack Providers: AWS-EC2 tools have to be installed on the agent.
Example:
- Depending on the Stack Provider type selected, do one of the following:
Docker:
Important! The "HOSTNAME" property must be set in the uc4srv.ini file.
Go to the Connection Properties section.
Enter the Daemon URL (the persistent process that manages the containers).
Important! The Daemon URL must be reachable from default agent selected above.
VMware:
- Go to the Endpoint section:
- vSphere Server URL: enter the URL of the vSphere server to which you want to connect. For example: https://vvievc01/
- Enter a Username and Password to access the server.
AWS:
- Go to the Endpoint section:
- Populate the following fields:
URL
The uniform resource locator (URL) of the Amazon EC2 web service entry point. E.g. https://ec2.amazonaws.com
Region
If your instances are in a different region, specify the region where they are located.
Note: AWS resources are managed within specific AWS regions.
Connection Timeout
The connection timeout, in seconds.
Request Timeout
The request timeout, in seconds.
Access Key
The access key ID associated with your AWS account (alphanumeric text string).
Secret Key
The secret access key associated with your AWS account.
Note: "Access Key" and "Secret Key" are used when executing ec2 tool commands (for example: run/start/stop/terminate instance...) in CDA provisioning.
Security Token
The AWS delegation token.
A new provider has been added with all required configuration data: host, credentials, repo, and so on.
What to do next:
Changing Properties of Stack Providers
Properties can be changed:
- From the Stack Provider sidebar displayed next to the table that lists the Stack Providers.
- In the Properties section of a Stack Provider.
You can change the following properties:
-
General
Basic attributes of the Stack Provider. You can edit the Name, Folder and Owner.
-
Description
The description is limited to 2000 characters.
-
(VMware) Endpoint
-
VSphere Server URL
Link to the persistent process that manages the containers.
- Username
- Password
-
-
(AWS) Endpoint
-
URL
The uniform resource locator (URL) of the Amazon EC2 web service entry point. E.g. https://ec2.amazonaws.com
-
Region
If your instances are in a different region, specify the region where they are located.
Note: AWS resources are managed within specific AWS regions.
-
Connection Timeout
The connection timeout, in seconds.
-
Request Timeout
The request timeout, in seconds.
-
Access Key
The access key ID associated with your AWS account (alphanumeric text string).
-
Secret Key
The secret access key associated with your AWS account.
Note: "Access Key" and "Secret Key" are used when executing ec2 tool commands (for example: run/start/stop/terminate instance...) in CDA provisioning.
-
Security Token
The AWS delegation token.
-
-
(Docker) Connection Properties
-
Docker Daemon URL
Link to the persistent process that manages the containers.
Important! The Docker Daemon URL must be reachable from the host where the deployment manager is running.
-
-
Accessed via Agent
-
Agent
Agent assigned to the Stack Provider. Agents execute the deployment processes on the appropriate physical system. For this to happen, the agent has to have the appropriate system privileges.
-
Login
Login object assigned to the Stack Provider. It contains login information in the form of credentials.
-
-
Actions
Actions are located in the toolbar. They can be also triggered from the context menu displayed after right-clicking the entity. You can trigger the following actions (depending on your permissions):
- Export: exports the Stack Provider definition in CSV format.
- Delete: deletes the Stack Provider.
- Archive: archives the selected entity. If an entity is archived, Restore is available (see also: Archiving Entities)
-
Errors and Warnings
This panel shows errors and warnings in the context of the current Stack Provider. If there are no errors or warnings, the panel is not displayed.
-
Custom Properties
The selected object may have more properties and property groups defined by the administrator. When defined, these properties are shown in the sidebar as separate panels and can be edited by you.
-
Right-click the entity and select Delete.
Note: You may only delete the entity when you have the appropriate permission on the containing folder (see Security Concept in CDA) and all of the listed conditions are met.
Conditions to delete entities of type Stack Providers
- Is not referenced by any Stack Template
See also: