
Please bare in mind that proper use of the Automation Engine requires at least two systems to be installed: a
Do not use blank spaces when naming the directories for the Automation Engine and the Agents.
![]() If you would like to print this page, click
If you would like to print this page, click ![]() in the menu bar above to expand the steps below:
in the menu bar above to expand the steps below:
To Prepare for the Installation
-
 Download and Prepare the Installation Files
-
Download the installation package from the Download Center
PCK.AUTOMIC_BOND 1.1.0 is required to use ARP notifications and Tasks.
- When installing on a Windows machine: if necessary, remove the blocking flag (Zone.Identifier indicates a potentially unsafe content) from all executables (.exe files), as windows prevents executing downloaded files from the internet to a NTFS file system.
To remove this blocking flag, do one of the following:
Unzip the archive by not using Windows Explorer's build-in unzip function.
If you use an alternative tool (e.g., 7-zip), the blocking flag is not propagated.
- Remove the blocking flag e.g., by using the tool streams.exe (see Microsoft Sysinternals on technet.microsoft.com/en-us/sysinternals/streams).
- Copy the unpacked
.exefiles to a device having a FAT file system and then copy them back to the installation directory.You can use a regular USB flash drive, which is typically FAT pre-formatted.
- Copy the installation files to the target system.
Preparation Progress

-
-
-
Important Notes
- Database administration rights are necessary to perform this step
- Please read the relevant notes about optimizing the AE database's performance carefully before you start setting up the database. See: Configuration & Performance of the Database, the Automic Compatibility Matrix for details on supported versions and platforms and the general information in Supported Platforms.
- Do not limit resource consumption. Transactions that repeatedly abort because of limitations that are specified in the database can impede processing in your AE system. Inconsistent database contents can be a result thereof and cause subsequent errors or endless loops.
- Please note that your database will become inconsistent when you modify database contents.
Disk Space Required
See also: AWA System Requirements and Sizing
Size required for the initial installation of an AE database
Test systems:
1 GB
Production systems:
Small systems
5 - 20 GB
Medium systems
20 - 50 GB
Large system
more than 50 GB
General Requirements
Installation settings for DB2 (to be configured on the DB computer):
- A 64-bit client must be installed.
- Install the appropriate DB2 client software on the Automation Engine computer in order to enable access to the database. It is important to note that the CAE version must correspond to the database version.
- Install DB2 for UNIX and Windows with the following options:
- 8, 16 and 32 KB page size for specific codes
- USER temp and system space must be 8K and 32K
- Create the AE database with an ASCII code table (code set 819 for ISO8859-1, code set 923 for ISO8859-15) instead of a Unicode table. Note that the default is UTF-8 (Unicode).
- Create a buffer pool of 8K and one of 32K. For each of the two page sizes, set up a system temp and a regular tablespace.
- Set up the ODBC string in a way that the database can only be accessed by using a valid user ID.
- The module DBMS_LOB has to be installed.
A temporary system tablespace of 32k must be available.
The following scripting example creates a new database with a specific coding:
create db uc4
automatic storage yes
on ...
using codeset <code set> territory <short form of country> ;The following is a scripting example for the US:
create db uc4 automatic storage yes on ... using codeset iso-8859-1 territory us ;
DB2 for UNIX or Windows
- Special requirements
-
DLCHKTIME to 1000
This parameter controls the database's deadlock time. The predefined default value is 10 seconds, which negatively impacts the system's performance (1000 corresponds to 1 second).
For example:
db2 -v update database cfg for UC4 using DLCHKTIME 1000
- LOCKLIST to 10240
- LOGBUFSZ to 2048
- APPLHEAPSZ at least to 2048
- PCKCACHESZ to 256
- CATALOGCACHE_SZ to 128
- AUTO_RUNSTATS to OFF. Manually execute the RUNSTATS when the database has regularly been in use for some time and all tables contain data records. DB2 selects incorrect access channels if RUNSTATS are processed on empty tables. Deadlock situations can occur which could eventually result in a complete system standstill. The file upd_stat.sql. is provided in the folder IMAGE:\db\db2\Automation Engine version. It contains the relevant statements for the manual RUNSTAT execution.
-
DB2_EVALUNCOMMITED to YES
-
DB2_SKIPINSERTED to ON
-
DB2_SKIPDELETED to ON
-
Setting up DB2 alias on CAE client
Setting for the DB2 code page:
-
Definition of tablespaces
Create 3 tablespaces as follows:
- 1 tablespace of page size 8 KB
- 1 tablespace of page size 16 KB
- 1 tablespace of page size 32 KB
SQLDRIVERCONNECT=ODBCVAR=NNJNIORD,DSN=DB2CLI;UID=uc4;PWD=--1018A94DA12E7FA991
The following parameters have to be set in order to improve performance for DB2 on UNIX/Windows:
These parameters can be called using the command "get dbm cfg" which requires no authorizations:
They can be set with db2set. For example: db2set DB2_EVALUNCOMMITTED=YES
db2set db2codepage=819
Login with DB2 Admin:
db2
catalog tcpip node <servername> remote <servername> server 50000
catalog database <db-name> as <alias-name> at node <servername>
quit
Please note that MS SQL Server is not supported when the Automation Engine is running on Linux. Take a look at the Automic Compatibility Matrix to know more about compatible applications, platforms & databases.
Database administration rights are necessary to perform this step.
Refer to the reference section of the AE database in order to optimize performance. See:MS SQL Server and the list of supported database versions.
Do no activate the option "autoshrink" in the database. This can occasionally cause an Automation Engine standstill.
Do not limit resource consumption. Aborting transactions due to limitations specified in the database can impede processing in the AE system. Additionally, inconsistent database contents can result, which can cause subsequent errors or endless loops.
Note that it is important to set the SQL cursor (1st digit=S) or to activate MarsConnection in the INI-file parameter for the ODBC access (SQLDRIVERCONNECT= ) in the particular component (Automation Engine, utility). Otherwise, the SQL Server database can only process one command at the time which results in the following error:
U0003590 DB error: 'SQLExecDirect', 'ERROR ', 'HY000', 'Connection is busy with results for another command'You can maintain the AE database by using partitioning with ILM (Information Lifecycle Management). Automic recommends reading the document about maintaining the data records before you set up the database.
Disk Space Required
See also: AWA System Requirements and Sizing
Size required for the initial installation of an AE database
Test systems:
1 GB
Production systems:
Small systems
5 - 20 GB
Medium systems
20 - 50 GB
Large system
more than 50 GB
Other Requirements
Installation settings for SQL Server (to be configured on the DB computer, i.e. the computer where the database is installed):
- 64-bit client must be installed.
- 64-bit client must be installed.
- 64-bit client must be installed.
Prerequisites for ILM
You can partition your database with ILM to guarantee the optimum performance of your Automation Enginesystem. MS SQL requires additional permissions to work with ILM:
- SQL Server requires the VIEW SERVER STATE permission
- SQL Database requires the VIEW DATABASE STATE permission in the database
To set up an MS SQL database
-
Create a a new database (DB computer).
- Start SQL Server if it has not already been started (ServiceManager).
- Launch SQL Server Management Studio.
- Create a new database (right-click Databases > New Database).
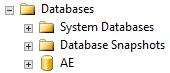
Automic recommends to name the database "AE" to better identify it at a later stage.
The size of the transaction log should be about 25% of the data-file size (for test systems with truncate log). To change the size go to Database Properties > Files.
Do not activate the Auto Shrink option in the database. This can occasionally cause an Automation Engine standstill.

- Create a new database (right-click Databases > New Database).
-
Create a new login (DB computer).
-
Navigate to the Security > Logins folder.

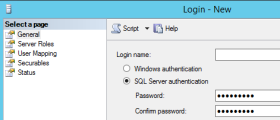
- Right-click the Logins folder and select New Login...
- Enter a login name.
- Select the authentication.
 Automic recommends using SQL Server Authentication.
 The database password cannot include the special characters [ ] { } ( ) , ; ? * = ! @ \. Otherwise, the components cannot access the database.
-
Click the User Mapping page and select the AE database.

-
Select the following roles:
- db_backupoperator
- db_datareader
- db_datawriter
- db_ddladmin
- db_owner
- public
- Click OK.
A new user is automatically created. The user is available in the Security > Users folder of the database.

-
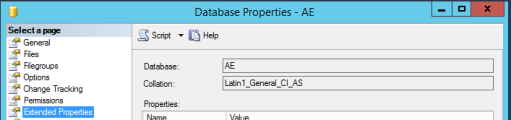
- Click the Extended Properties page and use one of the following code pages:
- "Latin1_General_CI_AS"
- "SQL_Latin1_General_CP1_CI_AS" (CP 1252)
-
Make sure the database is running with versioning. If not run:
alter database xxxx set read_committed_snapshot on
-
Click OK.
-
-
Set up the data source on the Admin computer (computer used by an administrator) for ODBC access:
Note that it is important to set the SQL cursor (1st digit=S) or to activate MarsConnection in the INI-file parameter for the ODBC access (SQLDRIVERCONNECT= ) in the particular component (Automation Engine, utility). Otherwise, the SQL Server database can only process one command at at time, which results in the following error:
U0003590 DB error: 'SQLExecDirect', 'ERROR ', 'HY000', 'Connection is busy with results for another command'-
Decide whether you want to create the data source as a User DSN (user specific) or as a System DSN (once for all users of this computer).
Automic recommends using the System DSN.
A System DSN must be set up if the Automation Engine should be run as a service on this computer.
-
Click the System DSN tab.

- Click Add... to add a new data source.
- Select SQL Server.
Note that the SQL native client is required in order to use the AE database with MARS. You can download it from the Microsoft homepage, if it is not yet installed on your computer.
-
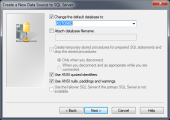
Some basic settings are required in the following dialog box:
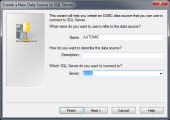
- Enter the name and description of the data source.
- Select local if the SQL Server is on the same computer, otherwise enter the name of the DB computer.
- Click Next >.
-
Select "SQL Server authentication" and enter the login ID and password in the following dialog box.
Automic recommends creating a separate database user for AE.
Do not use the user "sa" (system administrator).

- Click Next >.
- Now select the database.
-
Select the required options in the last dialog box.
Note that the third check box "Perform translation for character data" must not be selected.
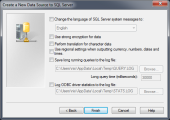
- Click Finish.
- Click TestData Source to check the configuration,
- Click OK.
Potential Problems
- 32-Bit ODBC is used instead of 64-Bit ODBC.
- The check box "Use ANSI nulls, paddings and warnings" is not activated.
-
-
Integrating an Alternative MS SQL Server DB Schema
Some users that run the Automation Engine with a MS SQL Server database and generate many transactions that results in having problems with the ghost clean-up process. For these users, Automic provides an alternative scheme for the Automation Engine, which actually splits the classic Automation Engine database into two separate databases.
The architecture diagram below shows the classic and alternate database schemas.

In the alternate database scheme, the first database looks similar o the classic Automation Engine database, while the second database is a simple one with heap tables that writes no transaction logs. Those tables outsourced to the second database are linked with the classic one via synonyms.
The concept of ghost records was introduced by Microsoft to enhance the performance of the database. When rows are deleted, they are simply marked as ghost records instead of physically being deleted. This concept guarantees a performance boost when deleting many rows. However, there is a downside, which is the ghost cleanup task. On big systems, the ghost cleanup process, a single-threaded task, may fall behind the rest of the system and blocks it. The weak point of our database were MQ tables. Since the Automation Engine is transaction-based, it writes every transaction in the database and deletes it after successfully processing it. Therefore we outsourced the MQ tables into a separate database with the feature of ghost records disabled.
Requirements
The alternate database schema:
- Is available for MS SQL Server only.
- Can be switched from/to the classic database scheme.
- Can be handled by DBLOAD.
- Is mandatory versioned in Automation Engine and will be activated by DBLOAD. See the following:
Creating an Alternate Database Schema Manually
- Create two databases with odbc connection. For this example they are called MAIN_1 and MAIN_2.
- MAIN_1 contains the initaldata.
- MAIN_2 contains the MQ tables for acceleration.
- Load the initaldata into the MAIN_1.
- Check the settings with dbcc useroptions.
- Make sure the database is running with versioning. If not run:
alter database xxxx set read_committed_snapshot on
- Prepare the MAIN_2 database.
- Create the MQ tables with KEY NONCLUSTERED. Create statements in all_MQ_S.txt.
- Check the settings with dbcc useroptions.
- Make sure the database is running WITHOUT versioning run:
alter database xxxx set read_committed_snapshot off
- Rename the original MQs on the MAIN_1 database to *_org with the statements:
- Create synonyms to the MAIN_2. Run the statements on MAIN_1:
rename_MQ_s_on_DB1.txt
You can generate the needed statements with:
select 'exec sp_rename ' + name + ' ,' + name + '_org;' from sys.tables where name like 'mq%'
Replace your database and owner name.
create_synonym_on_DB1.txt
You can create the needed statements with:
select 'create synonym [dbo].[' + replace (name,'_org','') + '] for [MAIN_2].[dbo].[' + replace (name,'_org','') + '];' from sys.tables where name like 'mq%'
Replace your database and owner name.
Row Versioning for Read-committed and Snapshot Transactions (Versioning) Is Mandatory on MSSQL
During the set_vers command we set the Versioning with alter database MAIN_1 set read_committed_snapshot ON for executing this command, we need to set the autocommit to ON and after the alter table back to OFF.
For this we implemented a new OPC in the database layer (ucudb) which is called DB_OPC_AUTOCOMMIT_ON (OFF).
To query the settings for the Versioning on you database you can use:
select is_read_committed_snapshot_on as DIVDB_Int4 from sys.databases where name = 'DB_NAME'
Create an Automation Engine System with the Alternative Scheme "from scratch".
You need two empty MS SQL Server databases with ODBC Connections and a User who can access both of the databases. For this example they are called MAIN and MQDB.
- MAIN contains all the tables and initaldata, except the MQ Tables
- MQDB contains all MQ tables with PRIMARY KEY NONCLUSTERED setting
In the UCYBDBld.ini is a new Area Called "MQDB". You can define the ODBC connection to the MQDB into the new MQDB section like in the well known ODBC area.
If there are a valid ODBC connection in the INI the DBLoad will run in split database mode. That means the needed operations are made to the MQDB database.
With two valid empty databases, you can run the UC_UPD.txt with the DBLoad and after a successful run you get the split database. After that, you need to load a license and you are able to start WP/CP on the system and use the Automic programs an usual.
Convert a Classic Automation Engine Database Scheme to the Alternative One
Create a second empty database . It is important that the new database has no tables defined! i.e. "SELECT count(*) as DIVDB_Int4 FROM INFORMATION_SCHEMA.TABLES" returns zero.
Define the ODBC connection for this database and set it to the new MQDB area in the ucybdbld.ini file.
Load a normal initaldata with the UC_UPD.txt. If the second database is empty the DBLoad splits your database into the new schema.
Important for customers they have already using the split schema with V10 and want to update to V12 split schema.
- The utility needs an empty second database (MQDB).
- You need to set back all the custom schema changes for the Utility, that it can upgrade to V12 and create the second database.
Description of Additional Modifications Done by the DBLoad if the MQDB is Enabled
The normal DDL is executed into the MAIN database, the utility will load the MQ_DDL into the MQDB.
After the MQ tables are in the MQDB the utility will execute:
- A rename process on the MAIN database to all MQs. After the rename all old MQ tables are called Tablename_ucorig (for example: MQ1CP001_ucorig)
- A synonym creator process on the MAIN database to all MQs in the MQDB.
Technical Description
The rename and synonym processes are made generic. Both are using a statement generator.
Rename statement generator:
select 'exec sp_rename ' + name + ' ,' + name + '_ucorig;' as DIVDB_String from sys.tables where name like 'mq%'
Synonym statement generator:
select 'create synonym [SchemaMAIN].[' + replace (name,'_ucorig','') + '] for [MQDB_DBName].[SchemaMQDB].[' + replace (name,'_ucorig','') + '];' as DIVDB_String3 from sys.tables where name like 'mq%%'
There are some parameters SchemaMAIN, SchemaMQDB, DBName, which are filled with the data form the current used databases.
These two statements generate all the statements which are executed on the MAINDB.
Database administration rights are necessary to perform this step.
Refer to the reference section of the AE database in order to optimize performance. See: Oracle and the list of supported database versions.
Modifications in database contents result in an inconsistent database.
You can maintain the AE database by using partitioning with ILM (Information Lifecycle Management). Automic recommends reading the document about maintaining the data records before you set up the database.
Disk Space Required
See also: AWA System Requirements and Sizing
Size required for the initial installation of an AE database
Test systems:
1 GB
Production systems:
Small systems
5 - 20 GB
Medium systems
20 - 50 GB
Large system
more than 50 GB
The code-page setting of the DB client must comply with the database settings.
You can choose from either of the following three code pages, whichever fits your needs best:
WE8ISO8859P1, WE8ISO8859P15 and WE8MSWIN1252.Which one you choose depends on the characters you need to store in the database. Therefore, ensure that the character set defined in XML_ENCODING in the variable UC_SYSTEM_SETTINGS corresponds to the character set of the database.
WE8ISO8859P15 seems the better choice as WE8ISO8859P1 does not support the Euro sign (€),
WE8MSWIN1252 supports the Euro sign plus several additional characters. Automic recommends using this code page if you are newly setting up your database.
For further details, see also ORACLE's support document no. 264294.1.It is not necessary to convert your database to a new character set f you have your database already set up using WE8ISO8859P1 and you do not need any of the additional characters.
When using 8-bit character sets you can use the same code set for the database and the database client. In this case there is no data conversion. However, the user interface, the server and the utilities also need to be compatible with the 8-bit character set.
You can query your database settings with the following command:
SELECT * FROM NLS_DATABASE_PARAMETERS
Specifying your code-page setting:
On Windows:
Set HKEY_LOCAL_MACHINE\SOFTWARE\ORACLE\...\NLS_LANG in the registry according to your database setting.On UNIX:
You can set the environment variable NLS_LANG as shown below:NLS_LANG =<NLS_LANGUAGE>_<NLS_TERRITORY>.<CHARACTER SET>;export NLS_LANG
For example:
NLS_LANG=AMERICAN_AMERICA.WE8ISO8859P15;export NLS_LANG
You can also define the code-page settings in the INI files of the relevant components ( [ODBC] section).
Oracle UTF-8 and the Automation Engine
-
The Automation Engine uses ANSI/ASCII. The DB client needs to be configured properly using a 8-bit character set; otherwise, data cannot be converted correctly.
The user interface uses UTF-8 and converts data to ANSI/ASCII according to the specified code page before it is transported to the Server (see key XML_ENCODING in the variable UC_SYSTEM_SETTINGS). Only use other character sets in close cooperation with Automic Support.
If you need your database to operate in UTF-8 you need to ensure that the data is converted correctly, otherwise the database will not work properly. Therefore, it is imperative that the code pages of the DB client and the user interface correspond to each other. In the connect string, set the third digit to "1" so that the string data is not checked (otherwise the Automation Engine cannot boot). In the log files, you can see the characters that Oracle has converted to ?, which are therefore not available.
- The following requirements are critical:
- If the database needs to be set with UTF-8 define NLS_LENGTH_SEMANTICS = CHAR.
- The database client must use a 8-bit character set (WE8ISO8859P15 or similar) and you need to define NLS_LENGTH_SEMANTICS = CHAR.
- In the variable UC_SYSTEM_SETTINGS, key XML_ENCODING, specify the same code page as is used by the database client.
- In the INI-file parameter SQLDRIVERCONNECT= (section [ODBC], use the same settings for the Automation Engine and the utilities, also with the same character set).
General Installation Requirements
Hardware/Infrastructure
- Automic recommends using an external disk subsystem with a connection via Fibre Channel for the data files. Under no circumstances should local disks with software RAID be used, as this could negatively affect the performance of the database and thereby that of the entire AE system.
- Latency periods should not be too long when the AutomationEngine (server) accesses the database (ping response with 8 K packet size < 1 ms). The same requirement applies when using RAC or Data Guard for the communication between database nodes.
- The database server must have sufficient RAM and a suitable swap area on the local disk.
- o < 2 GB => SWAP = RAM;
- o > 2 GB => SWAP = RAM x 0.75
- o No swap-in (SI) may take place.
- The database system(s) must have enough CPUs appropriate to the load. The run queue length of the available processors under high load can serve as a guideline here. If the run queue is frequently longer than 1, you may need to employ more CPUs.
- RUN QUEUE LENGTH <= COUNT of CORES
- The number of active components such as routers, switches or firewalls on the path between the AutomationEngine and the database should be minimized so as not to slow down access and to avoid single points of failure.
On the Database computer
A 64-bit client must be installed.
- Install the appropriate ORACLE client software on the Automation Engine computer in order to enable access to the database.
- Enter the database name in the file TNSNAMES.ORA.
- Change the block size to 8192 bytes when you install the database, and use your preferred character set as described dabove.
- Install the package DBMS_LOB.
The ORACLE-client version must correspond to the ORACLE version in use.
Prerequisites for ILM
You can partition your database with ILM to guarantee the optimum performance of your Automation Engine system. Oracle requires the permission on USER_OBJECTS to work with ILM.
Oracle RAC
- In the file INIT.ORA, set the parameter _lm_dd_interval to <= 10 seconds. You can also use the value "0" to identify deadlocks earlier.
- You require a database User ID for the Automation Engine with sufficient rights.
- All Automation Engine processes must only connect to one node. Use Oracle services to make sure only one node is taken and service is only available on one node at a time.
- Automation Engine supports Oracle RAC in an Automation Engine active/active configuration, but will only work with one node. Oracle services must be used and setup so that only one node is used.
- The Automation Engine has a built in software cluster; therefore putting the Automation Engine on multiple boxes for high availability (HA) requires no additional manual steps.
- DATA GUARD is not HA, so it does require manual steps. Depending on the mode that is used, you may experience a performance decrease (SYNC commit,…).
To Set Up an Oracle Database
1. Define Tablespaces (DB computer)
- Automic recommends facilitating unlimited extents (MAXEXTENTS) instead of limiting them.
- Tablespace sizes can be adjusted individually (minimum 1 GB UC4_DATA, 500 MB UC4_INDEX for a test environment).
- Tablespace administration by ASSM (Automatic Segment Space Management): SEGEMENT_SPACE_MANAGEMENT=AUTO.
- Log on to the ORACLE database using a user ID that has DBA rights, and define the tablespaces:
CREATE TABLESPACE UC4_DATA
DATAFILE 'Path to uc4_data.ora'
SIZE 1024M
AUTOEXTEND ON NEXT 1024M MAXSIZE 2048M
DEFAULT STORAGE (INITIAL 512K NEXT 2048K MAXEXTENTS UNLIMITED);
CREATE TABLESPACE UC4_INDEX
DATAFILE 'Path to uc4_index.ora'
SIZE 512M
AUTOEXTEND ON NEXT 512M MAXSIZE 1024M
DEFAULT STORAGE (INITIAL 512K NEXT 512K MAXEXTENTS UNLIMITED);
Changing the name of the tablespaces (UC4_DATA or UC4_INDEX) requires the names to be changed also in the installation file UC_DDL.SQL and the database table UC_DBSYN. The same applies for every AE update.
Automic strongly recommends using the tablespaces UC4_INDEX and UC4_DATA only, as otherwise you would have to manually adjust all SQL files during the upgrade process.
2. Create a Database User (DB computer)
It is recommended to create an additional database user for AE. This user must have the required privileges.
3. Change the Storage Parameters for Large Tables (DB computer)
- Increase the initial values as required for productive environments and large tables. This applies to the following tables:
- To increase the values, you need to change the installation file UC_DDL.SQL for the following tables:
INI, MELD, ODOC, OT, AH, AJPP, AJPPA, RH and RT.
CREATE TABLE MELD (
MELD_Idnr INTEGER NOT NULL,
MELD_USR_Idnr INTEGER NOT NULL,
MELD_Seen SMALLINT NULL,
MELD_TimeStamp DATE NULL,
MELD_MsgNr INTEGER NULL,
MELD_MsgInsert VARCHAR2 (255) NULL,
MELD_DeleteFlag SMALLINT NULL,
MELD_Client SMALLINT NULL,
MELD_Source INTEGER NULL,
MELD_Category INTEGER NULL,
MELD_Type INTEGER NULL,
MELD_Host VARCHAR2 (200) NULL,
MELD_ArchiveFlag SMALLINT NULL,
CONSTRAINT PK_MELD PRIMARY KEY
(
MELD_Idnr
) USING INDEX TABLESPACE UC4_INDEX
) TABLESPACE UC4_DATA
STORAGE (INITIAL 51200K NEXT 7168K MAXEXTENTS UNLIMITED);
4. Define the Rollback Segment
(DB computer)
Automic recommends defining a large roll-back segment for the Automation Engine. The size should be 10-25% of the Automation Engine data.
Scenarios
The Automation Engine is not fully RAC enabled, as it only benefits from the increased availability of an RAC system. Its performance, however, does not improve by using RAC technology. On the contrary, you need to make sure that your system only communicates with one node of the RAC system in order to minimize data traffic through the Cluster Interconnect and administrative workload. In doing so, you also reduce the likelihood of deadlocks that might occur in the database because of database nodes that try to access the database concurrently.
Within an RAC node, Oracle generally uses row-level locking. However, block-level transfer and resource locking is used between the RAC nodes.To make sure that the AE is always only connected to one node, Automic recommends using Cluster Managed Services. You need to configure them in a way that the service only runs on one node and that the cluster software moves it to the second node if required.
Example for setting up a cluster service:
srvctl add service –d <DB NAME> -s <SERVICE NAME> -r <Node 1> -a <Node 2>
srvctl start service –d <DB NAME> -s <SERVICE NAME>
Similarly, in TNSNAMES.ORA under CONNECT_DATA=(SERVICE-NAME=<SERVICENAME<) the service name created with srvctl must be used.
Make sure that the following database parameters are set when you are using an RAC system with the AE:
- INIT.ORA
active_instance_count = 1
This parameter is only relevant if an RAC system with exactly two nodes is used and ensures that all database sessions are always only connected at one node. It is not required if Cluster Managed Services are being used. - TNSNAMES.ORA
LOAD_BALANCE=ON (valid for the database client)
The effect is that the CONNECT load is tequally distributed across all listeners in the RAC.
_lm_dd_interval <= 10
This parameter determines the interval for the recognition or removal of deadlocks in the database.Filesystemio_options = SETALL
This parameter ensures that the database instance uses both ASYNC I/O and DIRECTIO. This enables you to achieve the optimal level of performance at a sensible buffer cache size.local_listener
This parameter ensures that the database instance registers with the local listener.remote_listener – only in RAC
This parameter ensures that the database instance registers with the other listener in the RAC.FAILOVER=ON (valid for the database client)
This parameter ensures that a failover of the database sessions takes place when the primary RAC node is no longer available.
Example of a corresponding tnsnames.ora for RAC entry:UC4P =
(DESCRIPTION =
(ENABLE=BROKEN)
(ADDRESS = (PROTOCOL = TCP)(HOST = knoten1-VIP)(PORT = 1521))
(ADDRESS = (PROTOCOL = TCP)(HOST = knoten2-VIP)(PORT = 1521))
(LOAD_BALANCE = on
(FAILOVER = on)
(CONNECT_DATA =
(SERVER = DEDICATED)
(SERVICE_NAME = UC4P) ### Cluster Managed Service Name
)
)

The characteristics of Oracle Data Guard configuration that are relevant for use with the AE are described below. The configuration that you will use depends on the available infrastructure and your requirements.
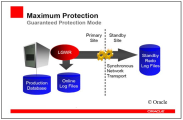
Configuration 1 (Maximum Protection - Guaranteed Protection Mode)
The primary database will only register a transaction as committed when this transaction was also committed to at least one standby database. If the transaction could not be committed to a standby database, the primary database stops.
The advantage of this configuration is that production can continue immediately after a short manual intervention when the primary database has failed. Check whether the standby database was synchronized with the primary database at the time it failed. If so, you can activate the standby database and continue.
Maximum Protection - Stops the primary database when the last standby database is no longer available:
Configuration 2 (Maximum Availability - Instant/Rapid Protection Mode)
This configuration ensures that the standby database(s) is/are synchronized in a timely manner. However, the primary database starts processing the next transaction even it has not yet been confirmed that the previous transaction was also committed to at least one standby database. Therefore, the primary database does not stop when no standby database is available anymore. Changes made in the primary database are automatically updated in the standby database as soon as it is available again. In this configuration, you must always check manually whether the standby database was synchronized with the primary database at the time of failure.
Maximum Availability - Switching to delayed mode is possible when the standby database is not available:

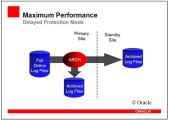
Configuration 3 (Maximum Performance)
In this configuration, changes will only be transferred to the standby database when the online redo log is changed. Therefore, you cannot expect that the standby database includes up-to-date data when the primary database fails. You always need to manually check all the AE activities that have taken place since the log has been changed the last time.
Maximum Performance - Changes are propagated when the online log is filled:
Comparison of Data Guard Configurations
As a general rule, all the configurations require the same quantity of user data to be transferred between primary and standby databases. The required workload when the primary database fails is always different. The lower the workload during a failure, the higher the load in the form of longer response times during day-to-day operation.
For the reasons mentioned above, it must be calculated for each case how the demand on availability can be realized with the infrastructure that is currently available.
Data Guard Mode Failover Effort Demands on Infrastructure Performance Maximum protection Medium
Start: COLD (under certain circumstances)High Behaves similarly towards the AE as in a single instance but the demands on database hardware and infrastructure (network) are considerably higher. Maximum availability Low
Start: NORMALVery high Only suitable for systems with low throughput Maximum performance Low
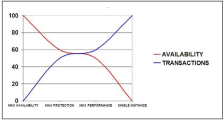
Start: NORMALVery high Only suitable for systems with low throughput The illustration shown below demonstrates the connection between performance and availability of the Data Guard configurations compared to a single instance (without hardware cluster). For a single instance, the availability is always minimal compared to a Data Guard solution. However, performance is almost not affected. On the contrary, for Data Guard in maximum availability mode, the availability is very high but the negative effect on performance is also at the maximum level. When you intend to install AE Data Guard ,Automic recommends focusing on your available infrastructure in order to ensure that you won't have to deal with performance bottlenecks.
Preparation Progress

-
-
Review the AE Server Default Ports
Required Security Setup
All ports listed in this section are default ports used during the installation procedure. Any port can be changed in the configuration files, depending on the infrastructure.
Component Configuration Connection to the Automation Engine Database Default setup:
-
Ports for Primary Work Process 2270
-
Ports for Communication Processes 2217-2221
-
Ports for Work Processes 2271-2279
-
Port for Service Manager 8871
- Port for Java Communication Processes (JCP) 8088
If an Agent is installed on the Automation Engine Server
See AE Agents - Required Security Setup
Be aware that the Automation Engine Server can be used as a deployment target. In this case, add this ports rules there as well, if required.
Preparation Progress

-
-
Review the AWI Server Default Ports
Required Security Setup
All ports listed in this section are default ports used during the installation procedure. Any port can be changed in the configuration, depending on the infrastructure. Make sure these ports are free or change f the defaults in the configuration files.
Component Configuration Incoming Default setup:
-
Port 8080
Connection to the Automation Engine Server Connection using the following ports must be allowed:
-
Default ports 2217-2221
Connection to the ARA Server Connection using the following port must be allowed:
-
Default port 80 (443 for https)
Preparation Progress

-
-
Review the AE Agents Default Ports
Required Configuration for Windows Agent
The Agent must be configured to use Windows PowerShell as Interpreter.
In the INI File UCXJWI3.INI (32-bit) / UCXJWX6.INI (64-bit), add the following key-value pairs in the section
GLOBAL:ECPEXE=powershell.exe -NonInteractive -ExecutionPolicy bypass -NoLogo -file ECPEXT=ps1Required Security Setup
Component Configuration Default setup
(at the system where the agent is installed; it can be changed in the configuration files).Default setup:
-
Port for file transfer 2300
-
Port for Service Manager 8871
Connection to the Automation Engine Server
(at AE server system).Default setup:
-
Default ports in use 2217-2221
Connection to the ARA Server
(at ARA server system).Default setup:
-
Default port in use 80 (443 for https)
All ports listed in this section are default ports used during the installation procedure. Any port can be changed, depending on the infrastructure.
Preparation Progress

-
-
Review the Default Ports for Super Users
Required Security Setup
Component Configuration Connection to the Automation Engine Server Connection using the following ports must be allowed:
-
Default ports 2217-2221
Connection to the ARA Server Connection using the following port must be allowed:
-
Default port 80 (443 for https)
Connection to the Automic Web Interface Connection using the following port must be allowed:
-
Default port 8080
Connection to the Service Manager Connection using the following port must be allowed:
-
Default port 8871
All used servers and databases Grant administrator access rights to super user
All ports listed in this section are default ports used during the installation procedure. Any port can be changed, depending on the infrastructure.
Preparation Progress

-


Next steps: