Understanding the Automic Web Interface
The Automic Web Interface is the browser-based user interface for Automic Automation. It gives you access to all program areas and functions required for your daily work. The interface combines standard browser capabilities with Automic‑specific navigation features and is organized into perspectives. A perspective is an area that groups the functions relevant to a particular user role.
All perspectives share the same basic layout:
-
Menu bar
Main navigation bar at the top of the screen. You move through its interactive elements horizontally.
-
Left navigation pane
Contains expandable menus that let you open folders, objects, object definition pages and more. You navigate through these elements vertically.
-
Main content area
Central workspace where you configure and work with objects, tasks, monitors and other items.
-
Right pane
Displays filters, detailed views, properties and other context-sensitive information. Like the left pane, you navigate it vertically.
Tips:
- Read the following topics to learn more about perspectives, navigation in AWI, accessibility, useful tips and tricks and more:
- For details about the layout and UI elements in specific perspectives, see:
-
Videos:
Important! Visit Broadcom Software Academy for a course related to this topic. For more information, see the Education section later in this page.
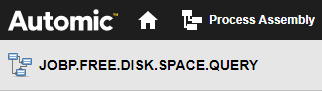
Menu Bar
The menu bar is the ribbon immediately below the browser toolbar. This screenshot shows the menu bar for a user with access to all perspectives. In your environment, only the perspectives you are entitled to are displayed:

The menu bar is common to all components and plugins provides access to the following areas and functions:
-
Customizable logo
-
Home icon.
Opens the Dashboards perspective.
-
Perspectives
Links to the perspectives you can access according to your user rights and privileges.
-
Global search for objects, object dependencies
-
Requests
Opens the Requests view. Requests are messages displayed during the task execution. They either require input from you or draw your attention to potential issues.
-
Messages icon
Opens the messages console, which shows messages about task execution and process status.
-
Intelligent Assistant icon
Opens the Intelligent Assistant panel, Automic Automation's Gen AI hub, where you can access the Automation Assistant and the Documentation Assistant.
-
Opens the Automic Automation Help, the inline product help and provides access to:
-
Keyboard Shortcuts: Lists and descriptions of AWI's keyboard shortcuts.
-
Getting Started: Dashboard view version-specific videos and links.
-
Learning Portal: Broadcom Software Academy, where you find courses about Automic Automation and other Broadcom solutions.
-
-
Session information and user settings
Displays the Automation Engine system, Client and User information.
The user can be displayed in two different ways
Click the adjacent arrow to expand a dropdown menu with options for user settings, connection information and addiitonal functions.
For more information, see:
-
Perspectives
-
Search functions:
-
Notifications
-
Gen AI hub
-
Session and user settings
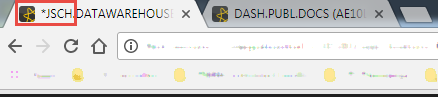
Browser Tabs
Browser tabs identify the pages opened in a browser window. For example:

In AWI browser provide standard browser functions plus additonal features:
-
You can open any number of objects, lists, tasks and monitors in separate tabs. Hover over a tab to display a tooltip with the following information :
Title (<connection>: client number | user/department | Automic Web Interface)
Example:

The Title depends on the perspective and content:
-
Dashboards perspective: Name of the Dashboard selected in the left pane.
-
Process Assembly perspective: Name of the selected folder in the Explorer or names of the open object.
-
Process Monitoring perspective: Name of the grouping criterion selected in the left pane, or the task name when a monitor is open.
-
Executions lists: Type of list (Executions, Parent Task Executions, Child Task Executions).
-
Administration perspective: Name of the selected object or view in the left pane, or the open object name.
-
-
An asterisk in the tab indicates unsaved changes. If you attempt to close the tab or log out, a dialog prompts you to save or discard your changes.
-
When you log in, you can assign a color to your connection. The icon in the browser tab, the web notifications, and the menu bar at the top of the screen use this color. It helps you identify which tabs and windows belong to the same connection, which is especially useful if you work with multiple Clients or systems.
For more information, see Opening a New Connection and Selecting the Connection Color.
Title Bar
The title bar is the ribbon displayed immediately below the menu bar when you open an object, a task, a list, and so forth. It provides the information you need to identify the current item.
Example of the title bar of a Workflow:
Depending on the item, the title bar can show:
Objects
- Name
- Title (if defined)
Monitors
- Name
- Title (if defined)
- RunID
Execution Lists
- Type of list (Executions, Parent Executions, Child Executions, Activator Executions)
- Name of the task
- Number of displayed records
- Timestamp of the latest update
Reports
- Task name
- RunID
Advanced Search
- Number of objects found
- Time of the latest index update
For more information, see:
Inline Notifications
In specific cases, AWI displays inline messages below the title bar to highlight restrictions or important information.
Examples:
-
Saved in Client 0
Some objects, such as Login (LOGIN), Connection (CONN) and Time Zone (TZ), are stored and maintained centrally in Client 0 and available in combo boxes in all other Clients. These objects are maintained by administrators and are valid for the entire installation. Developers and object designers can select and use them, but cannot edit them.
When such an object is opened from a non-0 Client, it is read-only and an inline notification indicates this.
-
Inactive Client
Developers and object designers can configure objects even if the Client is inactive. However, if the Client is inactive, automatic processing is not possible. If you execute an object, it receives the status STOP - Client-wide stop of automatic processing.
When you open an inactive Client, an inline message indicates that processing is not possible.Exception: You can manually start a Queue in an inactive Client and execute certain object types, for example Scripts.
-
Customized notifications
Administrators can configure a custom notification banner by creating a variable in Client 0 and defining the banner text there. For more information, see UC_NOTIFICATION_BANNER - Defining Custom Notifications.
Toolbar
Many lists and views have a toolbar with buttons that provide quick access to the most important functions for the currently displayed object, task, list or report. For example:

Panes
Lists and views have resizable panes.
-
The left pane lets you navigate the content of the list or view.
-
Click an item to open tit in the same browser window.
-
Middle-click to open it in a new browser window.
-
Right-click to open a context menu.
This image shows the left pane in the Process Assembly perspective; by right-clicking the DASHBOARDS folder, a context menu is displayed:

Note: The left pane on object pages lets you navigate through the various definition pages (General, Runtime, Attributes, and so forth). When you reopen an object, it opens on the definition page you last visited. AWI stores this per Client in your user settings. For more information, see Defining Objects Manually.
-
-
Right pane
When available, the right pane provides details about the selected item (object, task or execution), filter options, and additional information.
Version and Support Information
When you contact Support, you must provide information about your system and plug-in versions. You access this information from the drop-down menu at the right end of the menu bar.
- Open the drop-down menu.
- Select About. A dialog displays the relevant installation details.
This dialog also provides quick links to useful resources, such as:
- Customer portal
- CA Automic website
For more information, see Files to Aid Technical Support.
Variable Icon
Many input fields and combo boxes can be populated with variables and VARA objects. Whenever this is possible, AWI displays a variable icon next to the field. For example:
![]()
Select the icon to open a dialog where you can choose the variable or VARA object.
Education
The Broadcom Software Academy provides a wide range of free online trainings. For information about how to navigate through the Academy and on how to register for courses, see Automic Automation Education and Training.
The following course(s) are associated with this topic:
Hands-on Simulation Labs
Beyond the product documentation and courses, Broadcom offers a range of educational materials designed to guide you through Automic Automation's features and functions. Our interactive learning center is a dedicated platform offering immersive simulation labs to help you learn by doing. They are dynamic, hands-on exercises that complement the content of our courses. They don't just tell you how to use a feature; they let you experience it directly.
Visit the Broadcom's Simulation Labs website to explore the available labs and start practicing: https://simlabs.aod.broadcom.com/simulation/automation?product=Automic.